GridPACK On Cloud
This capability is under development.
The GridPACK development team is currently working on making GridPACK available through the cloud. The reasons for doing this are twofold. One is to reduce the overhead of getting started with GridPACK by providing an out-of-the-box build that can be used immediately by anyone interested in investigating GridPACK or trying out some of its applications and features. The second reason is to make GridPACK available to users that do not currently have access to Linux workstations or clusters or would like to see what can be accomplished with these kinds of resources before making the investment in setting up a Linux system.
Once you have created an instance of GridPACK on the cloud from a machine image file, it behaves exactly like a remote Linux computer and you can access it using the same kinds of methods that you would use to access any other Linux workstation or cluster. The current GridPACK images come preloaded with the VI editor and GNU compilers. It also comes with git, sftp, scp and svn, so any development you do can eventually be transferred to some other platform. Other packages can be installed with yum. You will have sudo privileges on any instance you create so it is possible to configure it to suit your preferences. The GridPACK images contain two directories. The software directory contains all the libraries needed by GridPACK, including PETSc, Boost, GA, and MPI. The GridPACK directory contains all of the GridPACK source code as well as two builds of GridPACK. The builds are located in GridPACK/src/build_ts and GridPACK/src/build_pr. Inside each of these directories is an install directory that can be linked to by new GridPACK applications. The build_ts and build_pr are built using the two-sided and progress rank runtimes of GA, respectively. The two-sided build is probably sufficient for most runs using small numbers of processors, the progress ranks build should be used when running on large numbers of processors.
Amazon Web Services: At present, GridPACK is only available through Amazon Web Services (AWS). The GridPACK development team is new to this type of computing environment and we encourage any users that run into difficulties to contact the development team. We will try and provide further clarification or make appropriate changes to our cloud distribution so that GridPACK will work properly. Our access to AWS is through a corporate account and we may have a different experience from users accessing the cloud from other environments. Again, if you are having problems and the instructions below do not appear to correspond with what you are seeing when you log in, please contact us and we will try and resolve whatever issues you may be having.
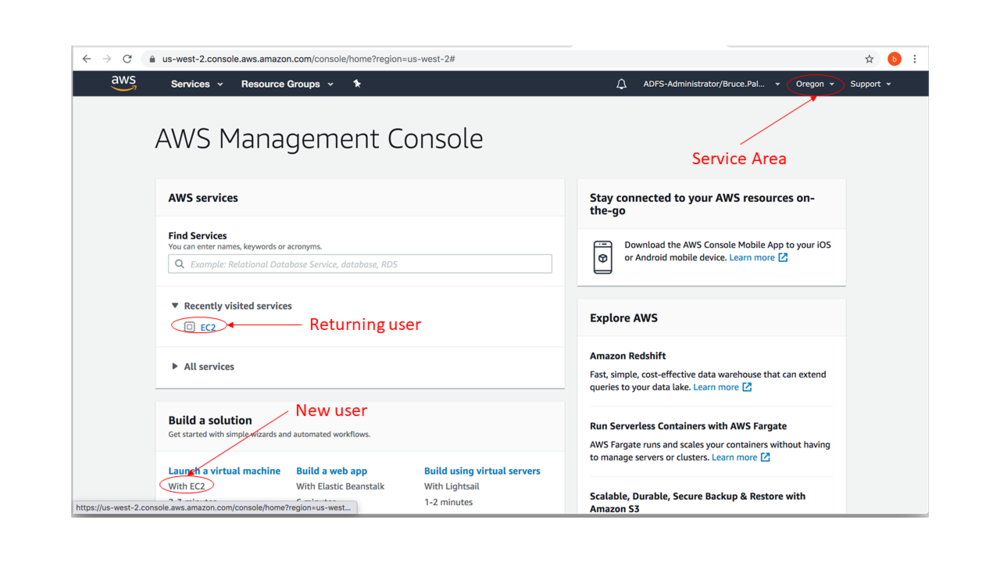
To use GridPACK via AWS it is first necessary to get an Amazon account. Once users have set up an AWS account and logged in they should end up on the AWS Management Console page.
This page will list a variety of AWS services available to users. Before doing anything else, you need to make sure that you are using the correct service area. In the upper right hand side of the page on the service bar there is a pull down-menu with a location on it (a state, e.g. "Ohio" or possibly a city, e.g. "Tokyo"). Make sure that this is set to "US West (Oregon) us-west-2". If you have never logged in before or want to create a new instance from a GridPACK Amazon Machine Image (AMI), go to the "Build a solution" box and click on the "Launch a virtual machine" link (it will also mention EC2). Select this.
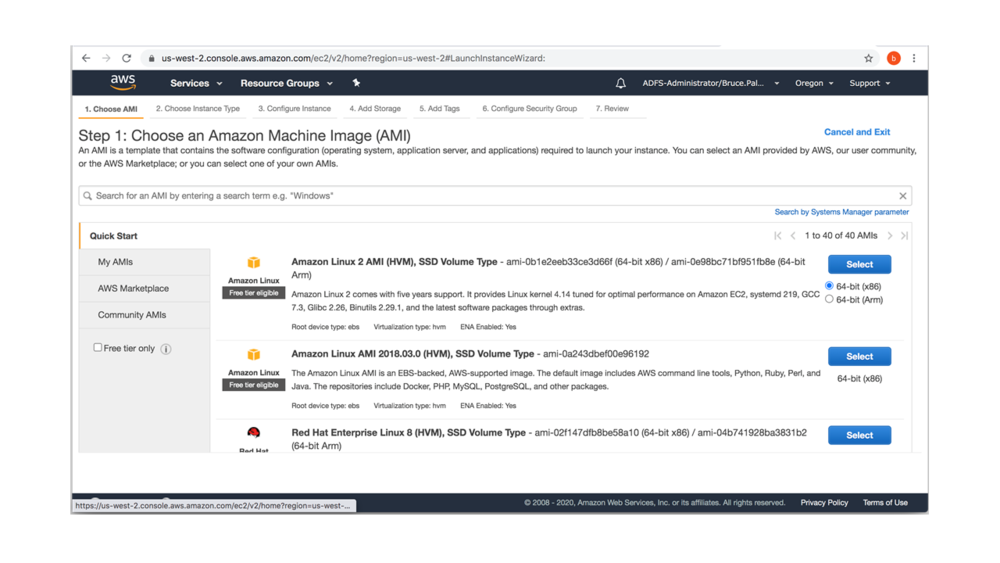
Finding and Launching an Amazon Machine Image If you clicked on the "Launch a virtual machine" link you will end up an a page titled ("Step 1: Choose and Amazon Machine Image (AMI).
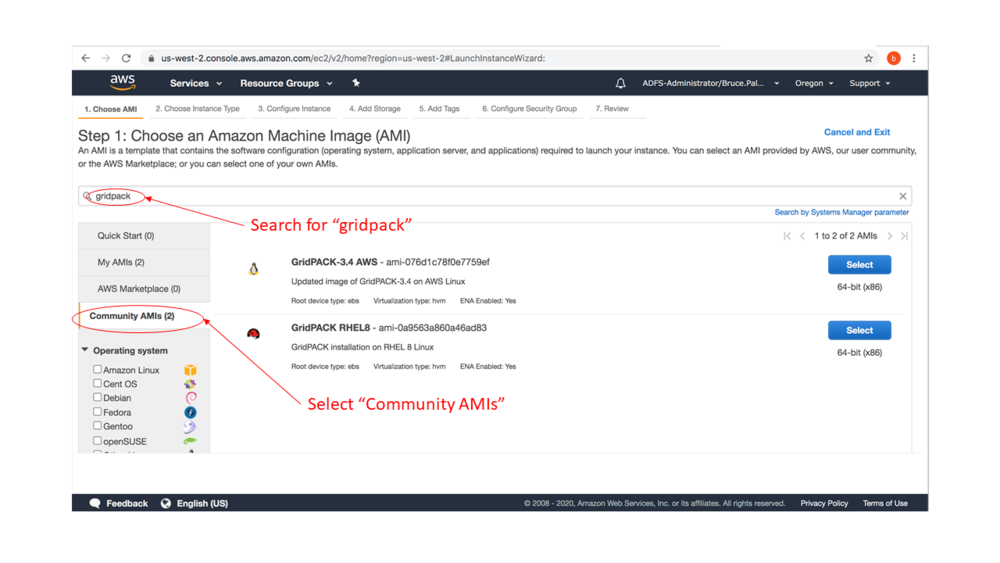
Select "Community AMIs" from the list on the left hand side and type in "gridpack" in the search field at the top. You should see some GridPACK AMIs.
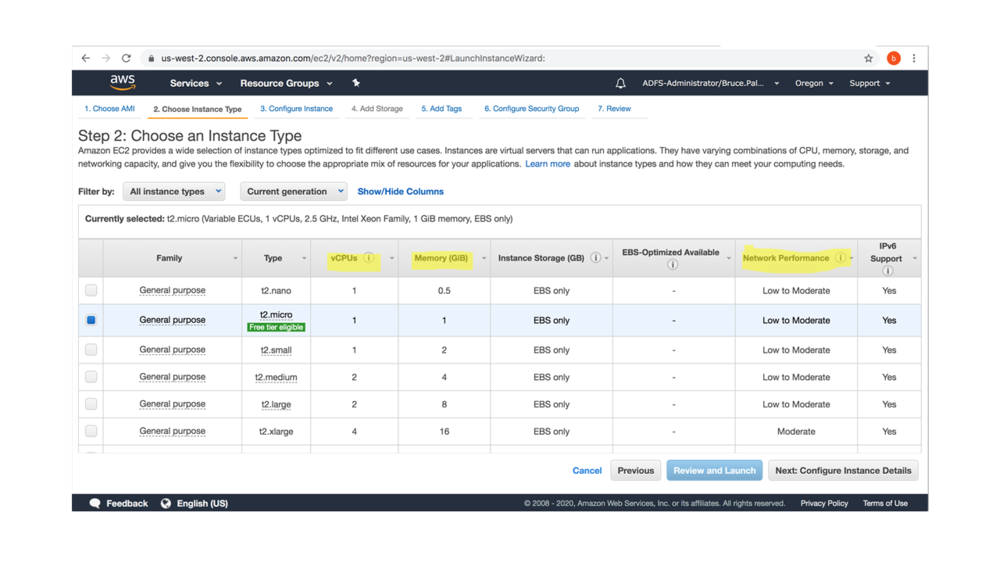
Select one of these images. The main difference between the different images is the operating system they represent. When you select one of these images, a page will pop up asks you to select a hardware configuration on which to run your instance.
The different hardware configurations offer different numbers of processors, different amounts of memory and different speeds for network communication. Generally, the more CPUs (vCPUs) and the higher the network performance, the more expensive it should be. The t2.micro configuration is free, but we have found that it is too small to work with. The default amount of memory for smaller instances is generally inadequate for GridPACK and should be increased significantly. This can be done when configuring the system.
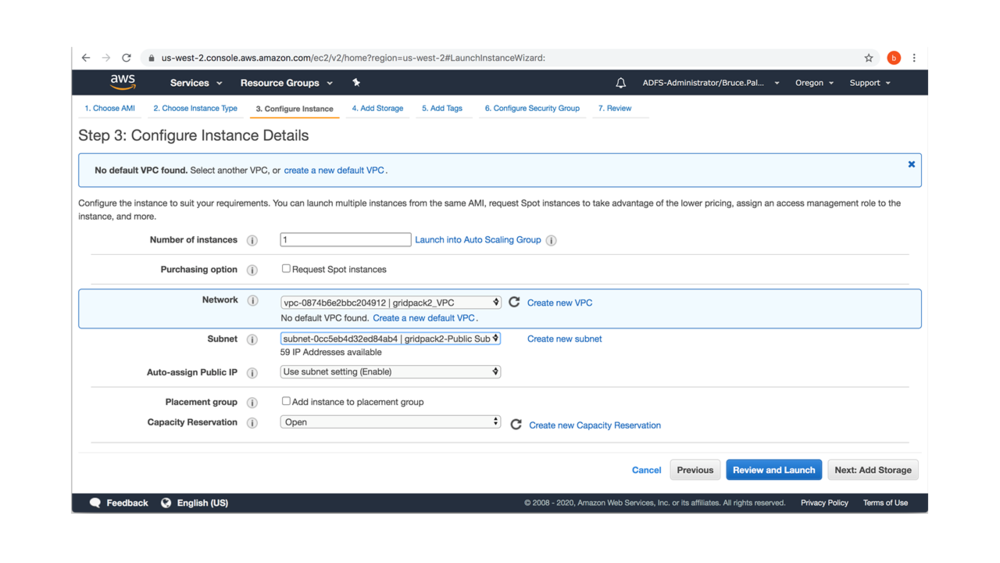
After selecting the configuration, click the "Next: Configure Instance Details" button at the bottom of the page. This page can be left as is, as long as a network appears in the Network block. Depending on how your account is configured, there may be more than one network or subnet available. We have both private and public subnets available. This example will use a public subnet.
After selecting a network, go to the bottom of the page and click on the "Next: Add Storage" button. Set the "Size (GiB)" field to at least 30 GiB. Then click on "Review and Launch" at the bottom of the page. Next click on the "Launch" button at the bottom of the page.
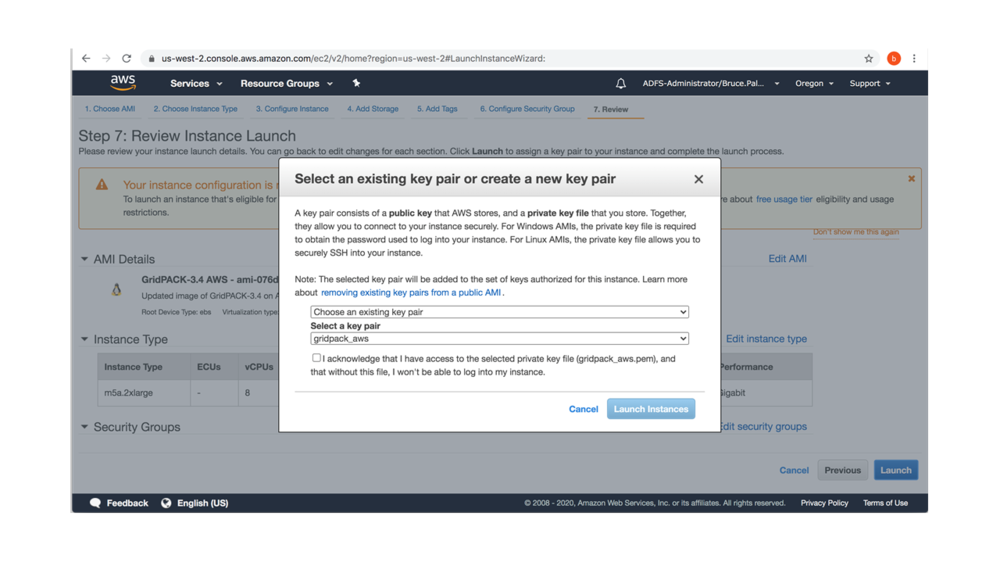
A dialog box will pop up asking you to "Select and existing key pair or create a new key pair". If you have created a key pair in the past, you can choose an existing key pair. Otherwise follow the instructions for creating a new key pair. Make sure to save the file with the new key pair that will be downloaded as part of this process. This file is required in order to log in to running instances.
If you have used AWS in the past, you may already have a key file available. If so you can go to the "Select a key pair menu" and choose one of them. Otherwise, you will need to select the "Create a new key pair" option in the upper menu and follow the instructions for creating a key file. Make sure to store the resulting .pem file where it won't get lost or deleted, otherwise you will not be able to access your instance. Once the key file has been selected, check the box acknowledging that you have access to the key file and then click on the "Launch Instances" button and then go to the bottom of the page and click on the "View Instances" button. This will take you to a page listing your instances.
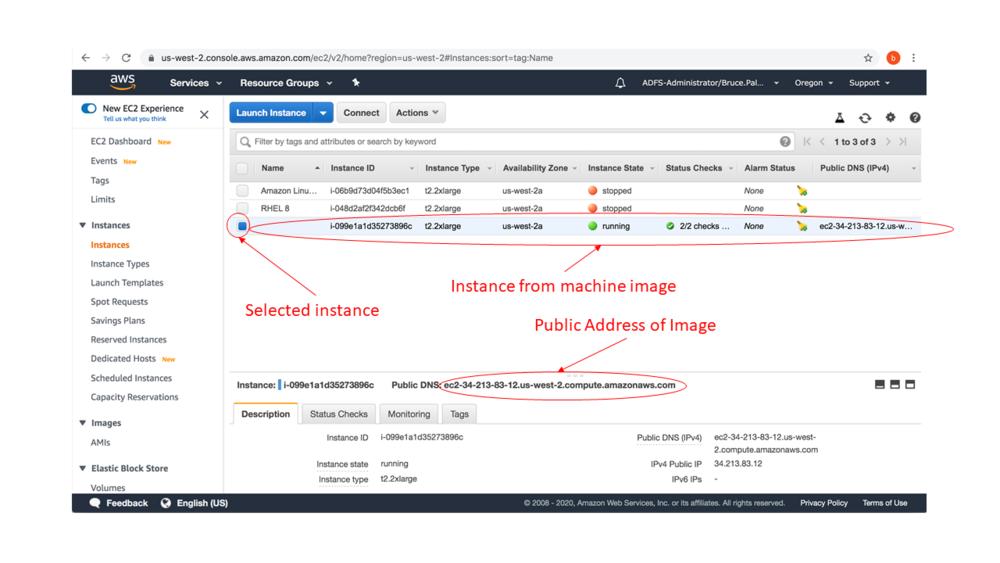
Your newly created instance should show on this page. You can give the instance a name by mousing over the instance name field and clicking on the pencil icon. The instance may take a few minutes to start up but eventually it should show as running in the "Instance status" field. At this point it is ready for use. Once you have created an instance, you cannot change its size without first saving it as an AMI and then starting a new instance from that AMI.
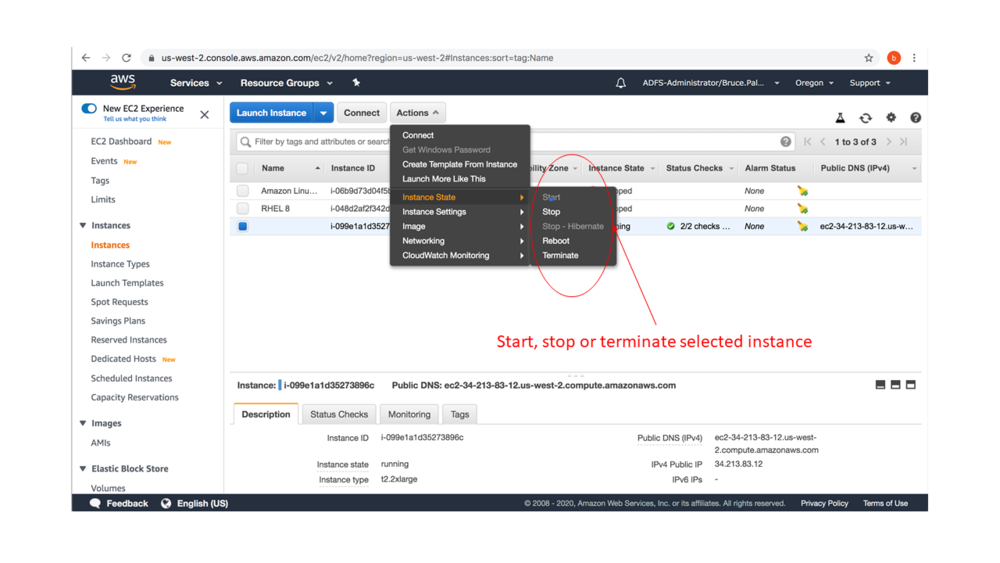
Once an instance has been created, you can start and stop it repeatedly by selecting the instance, going to the "Actions" menu and clicking "Start" or "Stop" under the "Instance State" submenu.
If you selected a public subnet when configuring the instance, then each time you start an instance, a machine name appears in the "Pubic DNS" field or and IP address appears in the "Public IP" field for that instance. Either the machine name or the IP address can be used to SSH into the running instance from some other computer. Note that every time you restart an existing instance, you will get a new IP address. Once an instance is running and has an IP address, it can be accessed from another computer just like any Linux workstation or cluster. When you first create an instance, it will always have an account called "ec2-user". This user name can be used be to log into the instance. You can use your privileges as superuser to add other user accounts, if desired. If you are using your instance to develop your own applications and decide that you want to use a different size instance, or perhaps you want to share it with others, you can save your instance as an AMI and then create a new instance from it on a different sized virtual machine. You can also create AMIs as a way to save your work, although you should also want to look at tools such as git and svn to make a permanent record of your code development.
There are a number of ways to access an instance once it is running. A few are listed below.
From Linux: This is the simplest platform to use to log into your AWS instance. Copy the key pair file that you are going to use to a directory on your Linux platform that you would like to use for logging in to the AWS instance. Change the permissions on the file using the command
chmod 600 keyfile.pem
where "keyfile.pem" is the key pair file name. SSH will not allow you to use a key file that is world readable. Then type
ssh -i keyfile.pem -l ec2-user ip.add.re.ss
where ip.add.re.ss is the numerical IP address in the "Public IP" field on the EC2 Dashboard page. This will log you in as user ec2-user. You can also use the public DNS name.
From a Mac: Accessing an instance from a Mac is almost the same as for a Linux box. Bring up a terminal on the Mac and go to whatever directory contains your key pair file. Use the above SSH command to connect to the remote instance after changing the permissions on the key pair file.
From Windows: A running instance can be accessed using Putty. A detailed description on how to do this is available here. To use Putty you will need to download both the putty and puttygen executables. These are both freely available from the Putty website.
Instances can also be accessed using Cygwin. After installing Cygwin, bring up a Cygwin window. This will behave largely like a Linux terminal. We will assume that the .pem file created when you started your AWS instance is located somewhere on your Windows desktop. If you just type ls to get a directory listing, you will see a variety of directories such as Desktop, Downloads etc. that mimic the folders on Windows. At least initially, these folders will not have anything in them. To find the .pem file, type df in the Cygwin window. You will probably see something like
   Filesystem     1K-blocks      Used Available Use% Mounted on
   C:/cygwin64    209712124 205861652   3850472  99% /
   U:             524284924 390740552 133544372  75% /cygdrive/u
Your Windows desktop and other folders are located under the partition /cygdrive/u. If you type cd /cygdrive/u and then type ls you will again see a listing of folders such as Desktop, Downloads etc. but this time they will actually correspond to your Windows folders. Cd into the folder containing the .pem file and change the permissions on the .pem file using chmod 600 keyfile.pem. Use ssh as described above to log into your running instance.
AWS Accounts: Information on setting up an AWS account can be found here and information on billing can be found here. Additional information on the properties of different instances can be found here. The properties page also has some information about setting up a free trial account with AWS.
